Organize Your Gmail Inbox with Google Apps Script

Managing a cluttered inbox can be overwhelming and time-consuming. Fortunately, Google Apps Script provides a powerful toolset that allows you to automate tasks within Gmail, making it easier to keep your inbox organized and streamlined. In this article, we will explore how to use Google Apps Script to organize your Gmail inbox efficiently.

Visit the Google Apps Script website, and create a new project by clicking on “New Project” from the main menu. This will open the Apps Script editor, where you can write and manage your scripts.

Label and Categorize Emails

The first step in organizing your inbox is to create labels and categorize your emails based on specific criteria. For example, you can create labels for “Project B,” “Project A,” “Important,” or any other custom categories you need. Use the following code to add labels to your emails:

				
					function categorizeEmails(){
let count = 100
const priorityAddresses = [
'important@example.com'
].map((address) => `from:${address}`).join(' OR ');

const labelName = "Important"; // Replace with your desired label name
const label = GmailApp.createLabel(labelName);

while (count > 0) {
const threads = GmailApp.search(`${priorityAddresses} -has:userlabels`, 0, 10)
count = threads.length
for(const thread of threads) {
thread.markImportant();
label.addToThread(thread);
}
}
}


Archive or Delete Old Emails

Having old and unnecessary emails in your inbox can lead to clutter. With Google Apps Script, you can automatically archive or delete emails that are older than a certain date. Here’s how:

				
					function archiveOldEmails() {
  const threads = GmailApp.search("in:inbox before:30d");
  for (const thread of threads) {
	thread.moveToArchive();
  }
}


					function deleteUnwantedMessages() {
let count = 100
const blockedAddresses = [
'spam1@example.com',
'spam2@example.com'
].map((address) => `from:${address}`).join(' OR ');
const searchQuery = `category:promotions OR category:social OR ${blockedAddresses}`;
while (count > 0) {
const threads = GmailApp.search(searchQuery, 0, 10);
count = threads.length
console.log(`Found ${count} unwanted threads`);
for(const thread of threads) {
console.log(`Moved to trash thread with id: ${thread.getId()}`)
thread.moveToTrash();
}
}
console.log("Deleting messages complete.");
}


Reply to Important Emails

It’s essential to respond promptly to crucial emails. With Google Apps Script, you can set up a script that automatically sends a reply to specific emails based on their sender or subject. Here’s a simple example:

				
					function autoReplyImportantEmails() {
  const importantSender = "important@example.com"; // Replace with the email address of the important sender
  const importantSubject = "Important Subject"; // Replace with the subject of important emails

  const threads = GmailApp.search(`is:unread from: ${importantSender} subject:${importantSubject}`);
  const replyMessage = "Thank you for your email. I will get back to you shortly.";

  for (const thread of threads) {
	threads[i].reply(replyMessage);
  }
}


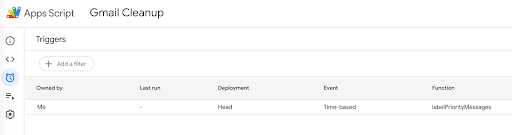
Schedule Your Scripts

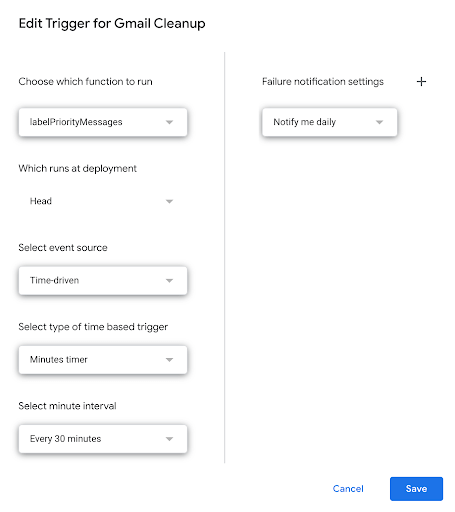
Once you have written your scripts, schedule them to run automatically at specific intervals. To do this, go to the Apps Script editor, click on the clock icon, and set up a time-driven trigger. You can choose to run the script daily, weekly, or at any custom frequency that suits your needs.

Conclusion

Organizing your Gmail inbox with Google Apps Script can significantly improve your productivity and reduce the time spent on email management. With the ability to label and categorize emails, archive or delete old messages, and automatically respond to important emails, you can maintain a clutter-free and efficiently organized inbox. Explore the power of Google Apps Script, and tailor your scripts to suit your unique email management requirements.


Read more about the latest tech trends in our blog.

Why you should Integrate Shopify with Marketing Cloud

Choosing the right platform to build your online business is a very important decision to make. Power technology infrastructure must be integrated into your site to support the customer buying journey and drive your customers toward a conversion. Integrating Shopify with Salesforce Marketing Cloud will help your business increase customer engagement, provide a personalized experience, and much more benefits that will help you generate conversions and optimize the journey of your customers.

How does it work?

In order to integrate Shopify and Marketing Cloud, you will need MuleSoft, to help exchange customers, products, and order data between both platforms. A tracking code is installed in your Shopify store that syncs product views and other actions taken in your store with Marketing Cloud. This allows you to generate reports, send customized emails throughout the entire shopping cycle, and have a 360-degree view of your customers so your team can create a more personalized experience, resulting in more engagement, more sales, and less investment.

overview shopify and salesforce marketing cloud demo

Benefits of the Integration

Personalized Shopping Suggestions Powered through Einstein AI

Every time your customer creates a Shopify account, they’re automatically added to your database so you can decide (depending on their behavior) the best email campaign or flows to include them in.

For example: Bob creates an account in your company’s online store and then he made a purchase. Now he receives a personalized order confirmation email with the details of his purchase and additional product recommendations based on his shopping interests.

These product recommendations are generated through Einstein AI, with customer data such as previous purchases, browsing history, and other significant shopping patterns.

Abandoned Cart Reminders Personalized with Shopify Data

With this integration, your customers can receive a customized email whenever they added products to their shopping cart, but didn’t complete the purchase. This feature allows you to configure personalized flows, so you won’t have to worry about losing a sale. Simply set up the amount of time you wish to remind your customers about their pending shopping carts, and the email will be automatically sent from Marketing Cloud.

Create Custom Marketing Campaign Flows

With Marketing Cloud, you can easily create and customize marketing campaign flows to reach your customers throughout different stages of the buying cycle. As mentioned above, you can create flows for abandoned shopping carts and email purchases. Flow can also be configured for newsletters, sales promotions and whatever email marketing approach fits your strategy.

How does a Guided Send work in Marketing Cloud?

  1. Create the email template and define your audience.
  2. Select the data extension option so you’re able to send an email to all of your target audience.
  3. Finally, select the email address from which the campaign would be sent
    Just follow these three simple steps, and you too can send email campaigns to your selected Shopify subscribers.

Track Success in Real-Time with Marketing Cloud Dashboard

With the Marketing Cloud dashboard, you get all the information you need to track the success of your campaigns in one centralized dashboard. With this integration, you and your team can access real-time performance results and statistical Shopify data for all of your campaigns on every email sent.

Some of the information you can access includes:

  • Behavior: clicks, forwards, and purchases.
  • Conversions and new subscribers
  • Email Activity: analyze which section performs better based on real-time results.
  • Delivery Data: number of emails sent and bounce rate
  • Engagement Data: open rate and click-to-open rate
  • Email Performance Data: conversion funnel and engagement distribution
  • Insights on best-performing emails, subscriber journeys, and engagement histories

Is this something you or your company need?

We have a team of experts ready to help you. Our technical team has partnered on multi-product, cross-cloud integrations with over 8 years of experience building on the Salesforce platform. We are experienced and confident in implementing third-party integrations. We can connect any application, technology, or system to Salesforce.

If you have any doubts about this integration being the right fit for your organization, don’t hesitate to contact our Sales team at [email protected] for more information.

Oktana YouTube: Embed & Share Videos in Salesforce

If a picture is worth a thousand words, a video is worth a million. That’s why we are proud to announce Oktana YouTube, our newest Lightning Web Component for Salesforce

OKTANA YOUTUBE: EMBED & SHARE VIDEOS IN SALESFORCE

Videos can be a strategic ally when it comes to communicating complex and important messages. Think about training the team on that new app you just purchased to increase sales productivity or that anniversary message from the CEO that cheers everyone up. Both are messages that need to be understood clearly and that have a greater impact when they feel more personal. Oktana YouTube makes your life easier by creating a place in your Salesforce org to embed and share YouTube videos to communicate with your team. 


Oktana YouTube


No code needed: Oktana YouTube is all about simplicity

Oktana Youtube is based on the Lightning Web Component technology. It is easy for Salesforce admins to install it from the AppExchange and to enable it on any Salesforce page. Drag and drop the component and you will be all set.

Alexis M. – Developer @Oktana Peru

Simplicity is at the core of Lightning Web Components and Oktana YouTube is no exception. Installing it from the AppExchange takes three (3!) clicks. Once the component is installed, you just enable it on the Salesforce page of your preference. The Lightning App Builder makes this easy for you. Drag the component and drop it wherever you prefer. As you can see, no coding skills are required to add Oktana YouTube to your org.


Admins have full control

As an admin, you get to decide whether to embed a corporate video for all of your users or let them decide what to watch according to their needs. That’s up to you. If you need them to watch a specific video (let’s say a tutorial, a demo, or a message from the team lead), paste the YouTube ID in and you are all set. If you prefer them to be able to search, just leave the YouTube ID blank.


Oktana YouTube means flexible layout

As you create a new page in Salesforce, you also decide where to place your components. We recommend the upper right corner as the best spot, but you can move it according to your needs. Oktana YouTube also allows you to adjust the title and the height to fit your expectations. Good enough? You get the same flexibility on desktop and mobile. It doesn’t matter where you are, you can always watch your embedded videos. 


Oktana YouTube


Search videos

As a Salesforce admin, you can allow your users to search YouTube videos from within your org. How does this work? Exactly as YouTube does. Enter keywords and the Lightning Web Component will retrieve related videos. Every user has their own viewing history stored, making it easier to locate previously watched videos. And you can always clear your search history with a simple click. 

Oktana YouTube is useful for everyone because it provides YouTube functionality in an intuitive way. If the admin allows it, users can visualize, share, and search any video they need. Anyone can use Oktana YouTube with other components in the same panel/screen. This way, users can access important videos without leaving Salesforce. 

Juan C. – QA Analyst @ Oktana Peru

All of this functionality makes Oktana YouTube a useful component you should definitely try. We leverage the YouTube API to embed and share tutorials, demos, or any other important message to your team right in your org. 

Install Oktana YouTube and give yourself another channel for your internal communication strategy. At Oktana, we care about your efficiency and experience in Salesforce, so if you think this is a good match for your company, install the Oktana YouTube Lightning Web Component for free from the AppExchange.

We create Salesforce products, check them out.

Product Design Innovation Process

Problem-solving with creative design

How to develop a design thinking and innovation strategy in digital product development.

Product Design Innovation Process

Nowadays designers look forward to providing shapes, forms, and uses that connect ideas with key functionality and contribute to social changes, taking advantage of technology benefits that we need in UX/UI, or experience, development. They optimize the results using design and critical thinking as well as integrated tools and strategies for the construction of the design of those digital products.

George Eastman,  founder of Eastman Kodak Company in 1892 said, “dreams are limited only by imagination.” The creative problem has a solving system if you’re able to pass that limitation.

Today, design involves technology to solve more complex usability problems. The amount of data required to solve problems has increased rapidly in this century. The design problem-solving process may need larger teams with more diverse members from different fields. Teams need to combine skills in order to solve the issue to bring design and innovation solutions together.

The product design objective process

The product design objective process is divided into 4 steps. 

  1. Contribute to social changes: This means knowing the society where you want to put a product for use. Proposing changes and supporting commitment in between teams, clients, users, and the tools you’re using. 
  2. Formalizing intentions: Where you add value connected to the reference of the society; making pieces that can be a more equal or balanced product.
  3. Giving form to uses: Making a better UI/UX system you optimize the efficiency and interfaces. Adapting uses to contemporary needs 

Taking hold of technologies: Integrating techniques and technologies while limiting environmental impact.

 1. Contribute to social changes

Problem or opportunity 

  • Emphasize: Researching and interrogating society and user needs. 
  • Define: Defining those elements and propose changes according to users’ and society needs. Creating a design brief, noting the design parameters.

Solution generation process

  • Define: Part of the solution generation process because through the definition you go to the ideation stage where you create ideas and select better design parameters for innovative opportunities and development. 
  • Ideate: Create ideas and select better design parameters for innovative opportunities development.
  • Prototyping: Start creating solutions more tangibly. Visualizing and storytelling. 

Solution evaluation process 

  • Prototyping: Interactive design and prototyping.
  • Testing: Validating the solution, refining results, and incorporating constructive feedback.

This is a process of emphasizing research and ideation which helps designers move to prototyping product development. It also allows you to have a very clear and defined ideation process. 

2. Formalizing intentions in the design thinking process

When you are in the ideation step, as mentioned above, you create ideas and select better design parameters for innovative opportunities development. 

Start with a problem, analyzing three elements:

  1. Technology: The main element; it gives you the tools to address this problem or opportunity
  2. Business: Business is focused on viability, making sure it is possible on the business side
  3. User. Last, but not least there is the user and the desirability

The design process begins with establishing a connection and understanding of the end user and the market in which the product will be positioned. Start by considering two perspectives:

  • Feasibility: Focused on technologies and tools they can use to address a need or opportunity
  • Viability: Focused on a given business strategy of a financial target

While these are important, they ignore desirability, or who the user is, what they care about, and why. Design thinking is often referred to as human-centered design because designers always start their approach by looking at the people and their needs before considering feasibility and viability. Merging these three elements you will find the best opportunity in the market. 

The divergent, convergent ideation process

Diverge to explore new possibilities:

  • Gather a wide range of stimulus and ideas.
  • Use a deck of creative prompting cards.
  • Brainstorm with colleagues who aren’t working on the project.
  • Document every idea.

Converge to focus on the best route forward

  • Refine ideas and recognize patterns.
  • Establish evaluation criteria.
  • Force yourself to answer if you had to do it now.
  • Prioritize.
  • Sketch ways of structuring your problem.
  • Give it some space.

Consider: What concept is most likely to resonate with our consumers? Which project approach is most likely to meet our team’s goals? Do certain ideas align more with company strategy?

Explore a range of options before selecting the best path forward

  • The divergent-convergent process is at the heart of all projects.
  • The usability of this structure is that it applies in any time frame of the project.
  • The main point is to recognize which behavior you might need at any moment. 
  • You have too many options and you’ve been looking for the main direction.

Consider: Projects that create new value have periods of uninhibited exploration followed by critical organization and refinement. You could use it in an afternoon meeting, several times in a one-week sprint, or routinely across a two-month project. Are you stuck in a rut on the project? Then explore new options through divergent thinking. Force yourself to edit and prioritize so you can work on something more specific.

One great example is the Sony PlayStation 5. It is a combination of all the experiences they had as a product, in terms of industrial design, digital prod dev, and UX/UI dev, that delivers a product that simplifies user interaction. 

3. Give form to users

Optimizing uses according to functionalities, performance and efficiency. This is something that needs to be merged in the user interaction and UX development. It is also important to consider users in the design process adapting to them and making it more accessible.

A great example is the integration of Slack with Salesforce. They considered the end-user in the design process, adapting to that end user’s needs and making it more accessible. Making interaction easier.

4. Taking hold of technologies

In this step, you use technologies as an advantage for the development of products. 

As an example, Salesforce and Salesforce Trailhead offer integration of techniques and technology development. They improved the existing functionality and converted intangible ideas to tangible solutions, simplifying access to technology.

Details that matter in UX/UI development and the design innovation process:

  • UX is not only UI, the interface is part of the experience.
  • Know your audience, you are not the main user of the product.
  • Adapt the designs for short attention spans.
  • The design simplifies the UX/UI.
  • Adapt the design process according to the product you are designing.
  • Ideate and prototype before constructing the final product.
  • Use real content while you are designing.
  • Make a simple and consistent design layout.
  • Recognize overall patterns and impact in the design process.
  • Make design accessible and inclusive.
  • Don’t try to solve a problem by yourself or everything at once.
  • Preventing errors is better than fixing them.
  • Receive informative feedback.
  • Avoid dramatic redesigns.

Suggested Trailhead Trails: