Today’s post is about, you guessed it, using Python and Salesforce together. Salesforce offers a few different REST API endpoints that allow us to interact with our org. They also offer a SOAP API, but we’re not going to use it today. In fact, we don’t need to worry about the endpoints at all. Thanks to a Python library called Simple-Salesforce.
We could do this all by hand with the built-in requests library. You would have to handle sessions, OAuth process and save tokens, deal with request headers, encoding and decoding JSON, creating configs to handle all the different endpoints, etc…
Simple-Salesforce Python Library
This is where the wonderful world of open source software comes to the rescue. A man named Nick Catalano created a library called simple-salesforce. From what I understand, he isn’t actively developing it anymore, but due to open source, the community has picked up adding features. It has about 50 contributors as of July 8, 2020. The lib is being actively developed, with new features added like bulk API support and formatted SOQL queries!

With a bit of the background out of the way, let’s start digging into the library and see what we can do with it. First, no better way to explain what simple-salesforce is than to quote the README itself:
Simple Salesforce is a basic Salesforce.com REST API client built for Python 3.3, 3.4, 3.5, and 3.6. The goal is to provide a very low-level interface to the REST Resource and APEX API, returning a dictionary of the API JSON response.
In plain text this quote means Python 3.x is supported, REST requests are handled for us, and the data we want comes back as a native Python data type. Great! Just what we want.
Login Information
First up, we’ll need a few things from Salesforce. Three things to be exact. Our username (email), password, and security token. The username and password should be pretty easy to find in your profile settings in your Salesforce org, but where do we find the security token? We don’t really see it, rather we’ll need to reset it.
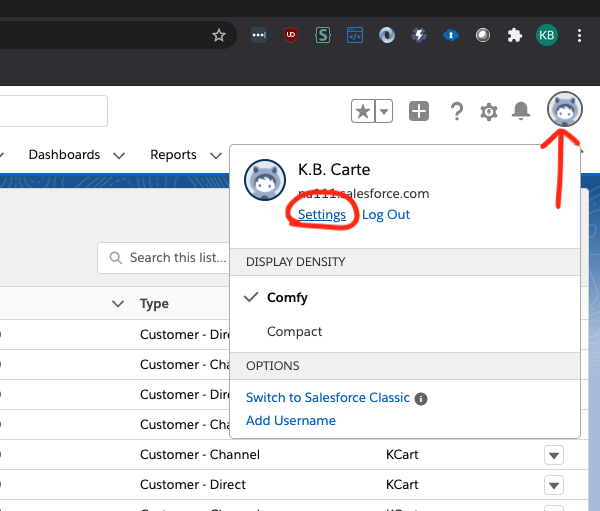
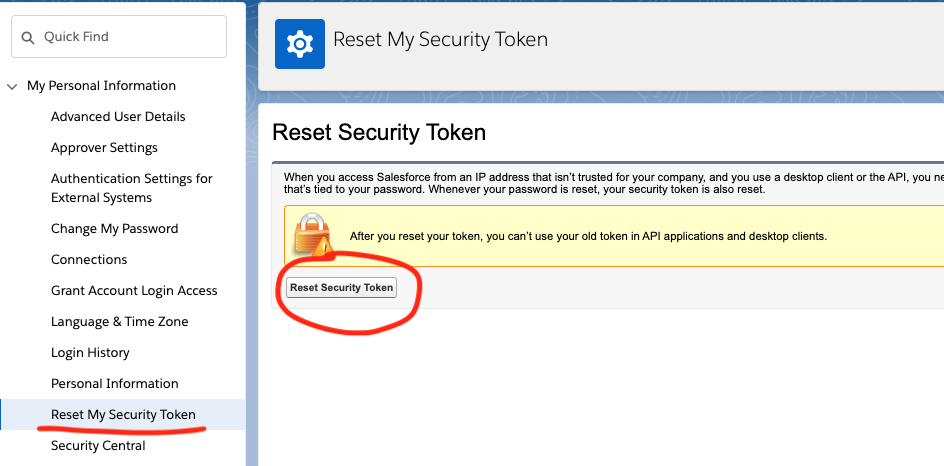
After clicking “Reset Security Token” , you should be sent an email containing your new token. Save this, we’ll need it in the next steps. That’s all we need from Salesforce to get up and running. Now that we have that, let’s start building our Python script and start playing with our org.
pip and pipenv
But first, a quick word about PIP. While working on this example, there was an update to simple-salesforce lib. Github has the current version and we need the format_soql method from it. But pip (PyPi) hasn’t been updated with the new version as of yet, July 2 2020. So, we’ll need to install it via it’s repo on Github.
from simple_salesforce import Salesforce, format_soql
from pprint import pprint
import json
Simple enough, import simple-salesforce, pprint (pretty print), and json. pprint is only used to make the terminal output look better, so it’s not needed for the core examples. json is used to get the credentials from a .json file, which is what we’ll do next.
# open file holding our login information
# we have the login info in a separate file so we can
# add it to .gitignore to help prevent leaking the information
# environment variables could also work
with open("login.json", "r") as login_file:
    creds = json.load(login_file)
Keep credentials secret
If you were on a project working in a private repo and multiple people needed access to the login credentials, keeping login info in the script itself would be okay, not ideal but okay. The reason we’re doing it is because it’s good practice and it’s open to the public on Github. So hiding and not committing sensitive information is important. This goes for any language or code base.
With that disclaimer out of the way, I included an example login.json file called very creatively “EXAMPLE_login.json“. Let’s take a quick look at it.
{
    "login": {
        "username": "[email protected]",
        "password": "My-REALLY-amazing-password",
        "token": "kdjfghdgfFGJbDFgd36DFGHDfgh"
    }
}
Very simple json object only containing the three things we got from the last steps. You can just copy/paste the “EXAMPLE_login.json” and rename it to just “login.json“, then update it with your login information. You can do this in the file explorer or VSCode, but here’s a quick example to do it from the command line.
cp EXAMPLE_login.json login.json
vim login.json
Salesforce Object
With our new login information, we can create the salesforce object back in our python script.
sf = Salesforce(username=creds['login']['username'],
                password=creds['login']['password'],
                security_token=creds['login']['token'])
And that’s it! We now have an object that represents our org, and now we can start doing cool things like SOQL or DML. Next, since we have everything we need to start awesomeness, let’s try a simple SOQL query.
SOQL Query
# an example of running a simple SOQL query
SOQL = "SELECT Id, Email FROM Contact"
data = sf.query(SOQL)
for d in data['records']:
    pprint(f"{d['Id']} -- {d['Email']}")
We defined the query string to get the Id and Email from all the Contacts, called the query() method of our salesforce object, then looped through the returned records and display the results. A note to those new to Python, in the pprint() we use something called an “f-string“ or format string. It makes it easier to embed variables in strings, much like the way Aura Components handle expressions with {!v.my_var}
SOQL is cool and all, but what about adding new data to our org? We can do that too, very easily. We’ll even try using the bulk api to insert 1,000 record. But first we need to create 1,000 records. This is going to be mock or fake data just for the sake of simplicity. We’ll also be testing on the Account object, so only thing required for new records is the Name field.
data = []
for i in range(0,1000):
    data.append({
        "Name": f"Bulk Test {i}"
    })
Now we have a list of dictionaries that represent our record data. Here we have a for loop filling a list with new items. We could also use list comprehension to replace these 5 lines of code with just one.
data = [{'Name': f"Bulk Test {i}"} for i in range(0, 1000)]Bulk Insert
To bring these new records into Salesforce, we use the .insert() method for the object we want, coming from the salesforce object we created. Confused yet? Here’s the insert code, it should help make things more clear.
# insert the new account using the bulk api
x = sf.bulk.Account.insert(data, batch_size=10000, use_serial=True)
pprint(x)
Here, we’re telling our org we want to use the bulk api “sf.bulk“, then which record object we’re working with “.Account.“, and finally what we want to actually do “.insert()“. We could use any object too, doesn’t have to be just Account. Even custom objects work, so instead of where Account is, we can replace it with something like sf.bulk.MyCustomObj__c.insert(..... We can also specify the batch size, or to process in serial.
Bulk SOQL
If you visit your org and take a look at all Accounts, you should see 1,000 new accounts with names like “Bulk Test 42”. We can also try doing another SOQL query, this time we’ll use the bulk api for the query. We’ll also show how to use things such as “LIKE” in SOQL statements.
# now lets get those records so we can delete them
SOQL = format_soql("SELECT Id, Name FROM Account WHERE Name LIKE '{:like}%'", "Bulk Test")
the_accounts = sf.bulk.Account.query(SOQL)
pprint(the_accounts)
Simple-salesforce now comes with the handy little method called format_soql that allows us to do things such as LIKE. format_soql is also the reason we used the Github repo for pip instead of what’s on PyPi, the new method was just introduced in the last 2 weeks.
Now that we know we can insert and add new data and records to salesforce, let’s see about removing it. Looking at the README, seems like the delete() method needs a list of records containing the Id of the record to be deleted. The records need to be a key-value pairs or dictionary just like how the query was returned. We already have all the Id’s for our inserted record from the “bulk.query()“
{'Id': '0013h00000EdP87AAF',
  'Name': 'Bulk Test 998',
  'attributes': {'type': 'Account',
                 'url': '/services/data/v42.0/sobjects/Account/0013h00000EdP87AAF'}}]
Looks like simple-salesforce also returns something called “attributes“. This just tells use which object we’re working with and which api endpoint we got the information from. For our example, and for the .delete() method, we only need the Ids. So let’s clean up and make a new list with only what we want.
account_ids = []
for a in the_accounts:
    account_ids.append({"Id": a["Id"]})
pprint(account_ids)
Here is another opportunity to practice list comprehension! See if you can get that for loop down to one line.
Bulk Delete
So now we have the list of Id’s, now we just simply call the delete() method and go refresh our org’s Account list.
data = sf.bulk.Account.delete(account_ids, batch_size=10000, use_serial=True)
pprint(data)
All the records we inserted are now gone!
Final Thoughts
In conclusion, let’s recap what we’ve learned. For one, Python is awesome. Second, integrating Salesforce in a Python project is very very simple. With only three pieces of information, we can create a native Python object representing our Salesforce org, do things with the object like SOQL and DML, and finally have access to multiple salesforce API such as bulk or search.
This is only scratching the surface. We can do much more and simple-salesforce also has methods for metadata and describe. From this basic example, we could bring in Salesforce data to Flask API’s we build or insert new data to Salesforce from a data scraping crawler we make in Python.
We can also harness the power of Python’s ecosystem of visualization and reporting such as Pandas or SciPy. Nothing stopping us from grabbing Salesforce data and running it through machine learning or neural networks using PyTorch or TensorFlow.
If you’ve made it this far, thanks for reading! Here I’ll link the demo repo containing all the code discussed in this post and a YouTube video of my presentation. Also, if you are interested in learning more about Python, you can check this article: How to do Time Series Analysis with Python & Pandas.