Salesforce SAML SSO: A Step-by-Step Guide

This blog will cover an example use case for a SAML SSO solution, explore related concepts, and show how to implement it in the Salesforce platform.

The example use case is the following:

There are two orgs, Epic Innovations and Secure Ops, where the latter contains classified information that cannot leave the system for compliance reasons. Agents working on cases in the Epic Innovations org need some additional information available in the Secure Ops org to work on some of their cases.

Salesforce SAML SSO: A step-by-step guide


The requirements are:

  1. Password-Free Access

Agents should be able to log in to the Secure Ops org without re-entering their passwords.

  1. Conditional Access Control

Agents should be able to access the Secure Ops org only if they have open cases of type Classified assigned to them.

The subsequent sections are organized as follows: Section I reviews the relevant SAML SSO concepts, Section II, describes how the solution can be implemented in the Salesforce Platform, and Section III shows the implementation results.

1. SAML SSO Concepts

What is Single Sign-On?

Single sign-on (SSO) is an authentication method that enables users to access multiple applications with one login and one set of credentials [1].

SSO greatly simplifies the user experience by eliminating users needing to remember and enter different usernames and passwords for each application they use within a particular environment.

SSO is widely used in web applications and SaaS systems to streamline user authentication and improve overall security. It can be implemented using protocols such as OAuth, OpenID Connect, and SAML (Security Assertion Markup Language).

Identity Providers and Service Providers

An Identity Provider (IdP) is a trusted service that stores and verifies a user’s identity. SSO implementations use an IdP to verify the identity of the user attempting to log in. If their identity is verified, they’re given access to the system. Fig 1 shows an example of the X login page, where Google and Apple can be used as IdPs to verify a user’s identity.
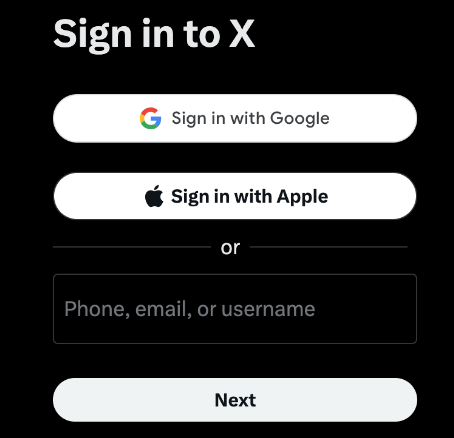
Fig 1. x.com login page.

A Service Provider (SP) is an entity that provides resources or applications to an end user. In SSO, the SP relies on an IdP to verify a user’s identity. Going back to the X example, the X platform serves as an SP, providing access to the X web application, and relies on either Google or Apple to verify the user’s identity.

Salesforce is automatically enabled as an identity provider when a domain is created. After a domain is deployed, admins can add or change identity providers and increase security for their organization by customizing their domain’s login policy [2].

SAML SSO Flows

When setting up SAML SSO there are two possible ways of initiating the login process: from the identity provider or the service provider. The steps for each flow as outlined in the official Salesforce documentation [3] are described below.

Service Provider-Initiated SAML Flow

  1. The user requests a secure session to access a protected resource from the service provider. For instance, the user would like to access X, which can only be achieved by logging in.
  2. The service provider initiates login by sending a SAML request to the identity provider.
  3. The identity provider sends the user to a login page.
  4. The user enters their identity provider login credentials, and the identity provider authenticates the user.
  5. The identity provider now knows who the user is, so it sends a cryptographically signed SAML response to the service provider. The response contains a SAML assertion that tells the service provider who the user is.
  6. The service provider validates the signature in the SAML response and identifies the user.
  7. The user is now logged in to the service provider and can access the protected resource.

Identity Provider-Initiated SAML Flow

The IdP-Initiated flow is a shortened version of the SP-Initiated flow. In this case, a SAML request is unnecessary.

  1. The user logs in to the identity provider.
  2. The user clicks a button or link to access the service provider.
  3. The identity provider sends a cryptographically signed SAML response to the service provider. The response contains a SAML assertion that tells the service provider who the user is.
  4. The user is now logged in to the service provider and can access the protected resource.

II. Salesforce Implementation

Solution outline

In this blog post, the chosen solution for the sample use case involves implementing a service provider-initiated SAML SSO flow. A connected app for the Secure Ops organization will be configured within the Epic Innovations organization. This setup enables agents to be seamlessly redirected to the Secure Ops login page.

Upon reaching the Secure Ops login page, agents will be prompted to authenticate using their Epic Innovations credentials. Subsequently, the system initiates a verification process to check for any open cases of type Classified associated with the respective agent. If open cases are identified, the agents will be granted access. With open cases, they’re allowed access to the system.

Setting up Salesforce as a SAML Identity Provider

To let users access external systems and, in this case, the Secure Ops org, with their Epic Innovations credentials, the Epic Innovations org has to be enabled as an Identity provider.

To enable a Salesforce org as an IdP [4]:

  1. From Setup, in the Quick Find box, enter Identity Provider, then select Identity Provider.
  2. Click Enable Identity Provider.

Once enabled, you can click Edit to choose a certificate, Download Certificate to download the certificate, and Download Metadata to download the metadata associated with your identity provider, which contains information such as the Entity ID, Name ID Format, and other relevant information that will be discussed in the following sections.

Fig 2. Identity Provider Setup in the Epic Innovations org.

Setting up Salesforce as a SAML Service Provider

The Secure Ops org can be configured as a service provider to facilitate access to the Secure Ops organization using Epic Innovations credentials. This is achieved by creating a SAML single sign-on (SSO) setting using some information from the identity provider.

To create a SAML Single Sign-On Setting [5]:

  1. From Setup, in the Quick Find box, enter Single, and then select Single Sign-On Settings.
  2. Click New; this option allows you to specify all the settings manually. You can also create a configuration with existing Metadata Files.
  3. Fill in the relevant information as shown in the picture below.
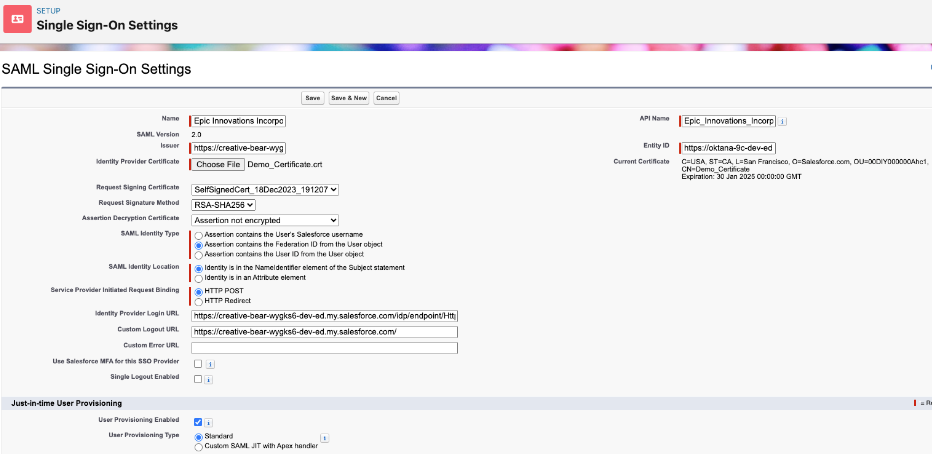
Fig 3. Single Sign-On settings in the Secure Ops org.

Next, some of the key fields are described:

Name: Epic Innovations incorporation. This is a name that easily references the configuration. This name appears if the identity provider is added to My Domain or an Experience Cloud login page.

Issuer: A unique URL that identifies the identity provider. This was taken from the Identity Provider Setup configured in the Epic Innovations org.

Entity ID: A unique URL that specifies who the SAML assertion is intended for, i.e., the service provider. In this case, the Secure Ops domain is filled in.

Identity Provider Certificate: The authentication certificate issued by the identity provider. This was downloaded from the Identity Provider Setup configured in the Epic Innovations org.

Request Signing Certificate: The request signing certificate generates the signature on a SAML request to the identity provider for a service provider-initiated login.

Request Signature Method: Hashing algorithm for signed requests, either RSA-SHA1 or RSA-SHA256.

Assertion Decryption Certificate: If the identity provider encrypts SAML assertions, the appropriate certificate should be selected for this field. In this case, the Epic Innovations org would not encrypt the assertion, so the Assertion not encrypted option can be selected.

SAML Identity Type: This is selected based on how the identity provider identifies Salesforce users in SAML assertions. In this case, the Federation ID will be used.

SAML Identity Location: This option is based on where the identity provider stores the user’s identifier in SAML assertions. In this case, we chose Identity in the NameIdentifier element of the Subject statement. When we set up a connected app, we’ll specify this in the Epic Innovations org.

Service Provider Initiated Request Binding: This is selected according to the binding mechanism that the identity provider requests from SAML messages. In this case, HTTP POST will be used.

Identity Provider Login URL: Since HTTP POST was chosen as the request binding, the URL with endpoint /idp/endpoint/HttpPost is used. This endpoint can be found in the Identity Provider’s metadata file. Also, the corresponding endpoint for HTTP Redirect is available in this file.

Custom Logout URL: This is a URL to which the user will be redirected once logged out. Here, the Epic Innovations’ My Domain was chosen.

Adding the Epic Innovations org to the Secure Ops login page

With the SSO Setting in place, it is time to add the Epic Innovations login option to the Secure Ops login page.

To add the Epic Innovations login option to the My Domain login page [5]:

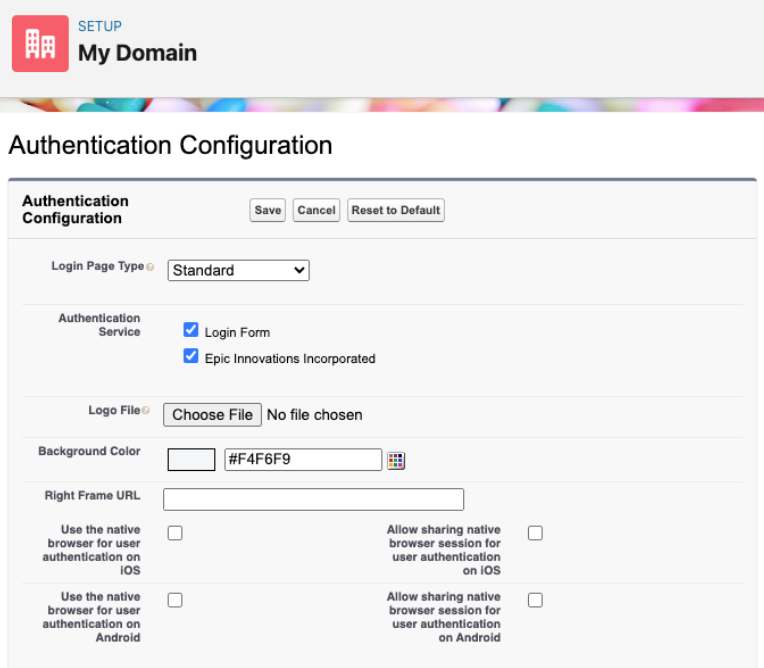
  1. From Setup, in the Quick Find box, enter My Domain, and then select My Domain.
  2. Under Authentication Configuration, click Edit.
  3. Enable the Epic Innovations option.
  4. Save the changes.
Fig 4. My Domain Authentication Configuration in the Secure Ops org.

Specifying a Service Provider as a Connected App

A connected app that implements SAML 2.0 for user authentication can be set up to integrate a service provider with Epic Innovations org.

To set up the connected app [6, 7]:

  1. From Setup, in the Quick Find box, enter Apps, and then select App Manager.
  2. Click New Connected App
  3. Fill in the basic information section as appropriate.
  4. In the Web App Settings section, fill in the Start URL with the Secure Ops’ My Domain. This will redirect users to Secure Ops org when they access the connected app.
  5. Click Enable SAML; this will allow more information to be filled in.
  6. For Entity ID, fill in the Secure Ops’ My Domain.
  7. For the ACS URL, which stands for Assertion Consumer Service URL, fill in Secure Ops’ My Domain. The SP’s metadata file can provide this.
  8. For Subject Type, select Federation ID. Remember that the service provider set the Identity Type to Federation ID.
  9. For Name ID Format, select the one that matches the NameIDFormat in the SP’s metadata file.

Add the Connected App to the App Launcher

Since the created Connected App has the start URL set up, it can be added to the app launcher for easier access. To do this:

  1. From Setup, in the Quick Find box, enter App Menu, and then select App Menu.
  2. Then, search the Connected App and mark it as Visible in App Launcher.

Setting up conditional access control

As stated in the requirements, users should only be able to access the Secure Ops org whenever they have open cases marked as classified. A Connected App handler will be used to fulfill this requirement. Connected App handlers can be used to customize connected apps’ behavior when invoked.

A Connected App handler is an Apex class that extends the ConnectedAppPlugin class. Here is the entire implementation for this use case.

				
					global with sharing class SecureOpsAppPlugin extends Auth.ConnectedAppPlugin
{
        global override Boolean authorize(
Id userId,
Id connectedAppId,
Boolean isAdminApproved,
Auth.InvocationContext context
    ){
        // get the number of open cases the user has
        Integer i = [
SELECT COUNT() FROM Case
WHERE
Status!='Closed' AND Type='Classified' AND OwnerId=:userId
   ];
        
        // if the user has one or more cases open, authorize access
        return (i > 0);
    }
}


As mentioned earlier, the created class extends the ConnectedAppPlugin class. In this case, the authorized method is overridden. This method permits the specified user to access the connected app [8]. The method returns a boolean indicating whether the user is approved or not to access the connected app. A value true indicates the user is authorized, and a false indicates that it didn’t grant access.

Since the requirements indicate that access should be denied if there are no open cases, the code runs a COUNT query to check the number of Open cases of type Classified the user has. If the user has at least one case with those characteristics, the method returns true, granting access to the connected app. Otherwise, it returns false, denying access.

Managing Users

There’s one last task before diving into the results: user management. While configuring the Single Sign-On settings, it was established that the Federation ID would be the identifier for the user logging in.

Consequently, any user logging into the Secure Ops organization via the Epic Innovations login should have a corresponding user in the Epic Innovations organization with a matching Federation ID. If a matching Federation ID is not found, the user cannot log in.

To set the Federation ID for a user:

  1. From Setup, in the Quick Find box, enter Users, and then select Users.
  2. Find the user and click Edit.
  3. In the Single Sign On Information section, fill in the Federation ID field.


III. Results

To validate the implementation, let’s first try to access the Secure Ops org without any cases of type Classified open.

From the App Launcher, we select the Secure Ops Solutions connected app we created.
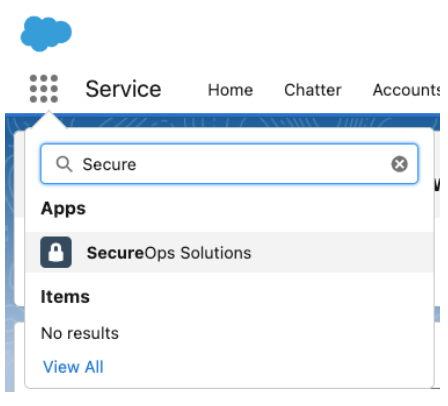
Fig 5. Secure Ops Connected App in the App Launcher.

This redirects us to the Secure Ops organization where we have the option to log in with Secure Ops credentials or via Epic Innovations, we choose Epic Innovations.
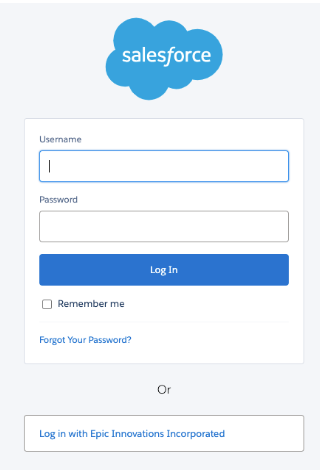
Fig 6. Login options for the Secure Ops organization.

We get an insufficient privileges error because the Epic Innovations organization doesn’t have any open cases of type Classified. So, our application handler denies access to the Secure Ops organization.

Fig 7. Insufficient privileges error when trying to access the Secure Ops organization.

Now, let’s create a case and set the type to be Classified. Since we don’t have any other automation, the case is automatically assigned to our user. We can now try to access the Secure Ops org.
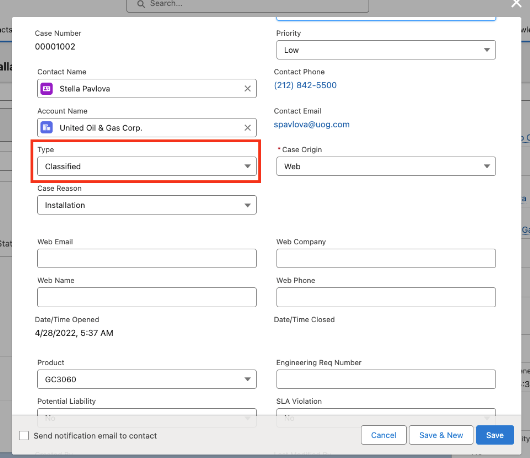
Fig 8. New case of type Classified in the Epic Innovations org.

If we attempt the same process, we can log in to the Secure Ops org.


Contact us to explore our services and discover how our extensive knowledge at Oktana can assist you in launching a successful project.

How to Make Your Salesforce Org Secure

In our previous blog post, “One way to keep your org secure: Salesforce Health Check” we covered the built-in Salesforce Health Check tool, the benefits of running a health check, and why you and your company need one.

This blog will cover some in-depth steps you can follow as a guide if you are a Salesforce developer or Admin to make your org more secure. That being said, let’s get to it!

Salesforce org secure health check

The Lightning Platform has been migrating from Aura components to Lightning Web Components (LWC) for some years. Even though both are still supported and can coexist on the same page and even share information, Salesforce is focusing on LWC, and we should do the same. 

When you run your Health Check application, you have 3 moving parts involved:

  1. The Salesforce org
  2. The client (LWC)
  3. The backend code (Apex)


We have configurations available in Setup > Security, allowing us to configure how the app runs. I recommend turning on the following options: 

  • Require HttpOnly Attribute

Setting the HttpOnly attribute will change how an app communicates with the Salesforce server by increasing the security of each cookie the app sends. Since HttpOnly prevents cookies from being read by JavaScript, the browser can receive the cookie, but it cannot be modified in the browser. 

HttpOnly is an additional flag included in the Set-Cookie HTTP response header. Using the HttpOnly flag when generating a cookie helps mitigate the risk of a client-side script accessing the protected cookie.

  • Enable User Certificates 

This setting allows certificate-based authentication to use PEM-encoded X.509 digital certificates to authenticate individual users to your org.

  • Enable Clickjack Protection

You can set the clickjack protection for a site to one of these levels.

  • Allow framing by any page (no protection).
  • Allow framing by the same origin only (recommended).
  • Don’t allow framing by any page (most protection).

Salesforce Communities have two clickjack protection parts. We recommend that you set both to the same level.

  • Force.com Communities site (set from the Force.com site detail page)
  • Site.com Communities site (set from the Site.com configuration page)
  • Require HTTPS

This setting must be enabled in two locations. 

Enable HSTS for Sites and Communities in Session Settings.

Enable Require Secure Connections (HTTPS) in the community or Salesforce site security settings.

  • Session Timeout

It’s a good idea to set a short timeout period if your org has sensitive information and you want to enforce strong security.

You can set values, including: 

  • Timeout value
  • Force logout on session timeout
  • Disable the timeout warning popup
  • Enable Cross-Site Scripting (XSS) Protection

Enable the XSS protection setting to protect against reflected cross-site scripting attacks. If a reflected cross-site scripting attack is detected, the browser shows a blank page with no content. Without content, scripts cannot be used to inject attacks. 

  • Use the Latest Version of Locker

Lightning Locker provides component isolation and security, allowing code from many sources to execute and interact using safe, standard APIs and event mechanisms. Lightning Locker is enabled for all custom LWCs and automatically updates. If you’re using Aura, check your version for compatibility.

One more thing...

I want to spend more time discussing a feature that helps us run our application even more securely. And I am talking about Salesforce Shield. Salesforce Shield allows you to run your application more securely with some features like encryption and monitoring. It adds an extra layer of confidence, privacy, and security and lets us build a new level of trust, compliance, transparency, and governance.

Salesforce Shields is composed of 3 easy to use point and clicks tools, which are:

  1. Platform Encryption: It is designed to bring us state-of-the-art encryption while we do not lose access to key features such as search, validation rules, etc. It can derive the encryption keys from org-specific data or even import our encryption keys(adding an extra layer of control)
  2. Monitoring Events: We often need to track specific events in our orgs (who accesses a piece of data, how the encryption keys are, who is logging, and from where). Monitoring events is the tool for it allowing us to track and access all these events and more from the API and integrate it with the monitoring tool of our choice(New Relic, Splunk, others)
  3. Audit Trail: Some industries require us to keep track of changes in data. Turning on tracking specific fields and setting up an audit policy, we can store historical values for up to 10 years.

Conclusion

It is essential to consider security while developing apps and maintaining our Salesforce org secure. And even though it might seem complicated (and it is), incorporating the Health Check tool and salesforce shield in our development process will help us to keep our org in a good, healthy state.


You can also watch our on-demand Health Check Assessment webinar by my colleagues Zach and Heather, where they covered 4 simple steps to ensure the health of your Salesforce org. 

What is a Salesforce Health Check

You got your Salesforce org – a shiny, brightening, brand-new org– ready to keep and maintain the most important information your company has: your customers’ information. Also, you start digging into the AppExchange to get those apps we love to provide a better service to your customer or the people who provide service to them. You could have needed to customize your org so it fitted with your business flow or integrate it with that legacy system which is the most important piece in your selling workflow.

As time passes, as all of us, our orgs get bigger, with more data, apps, customizations, and maybe more integrations. We are happy with all this growth as it means that our business gets bigger with more satisfied customers and more sales – in other words, more money. But it also means that our beloved org may have more security concerns that we need to focus on, and as it gets bigger and bigger, the more difficult to track the issues.

Fortunately, Salesforce provides us with a safety inspector that guides us through reviewing our security flaws and getting them fixed. So let’s understand this tool and why it is so useful to any company using Salesforce.

How does the Salesforce Health Check work?

I am not talking about Homer Simpson (we all know that if he is capable of securing a power plant, he would be an excellent Salesforce Admin). 

power plant health check homero
Source: miro.medium.com

I am talking about the Health Check tool. This automated tool lets us review in a dashboard all the issues our org has and guides us through the process of fixing them.

First, you have to be a System Administrator and go to:

Setup > Health Check > Wait a few seconds (I do not suggest going for a coffee yet)

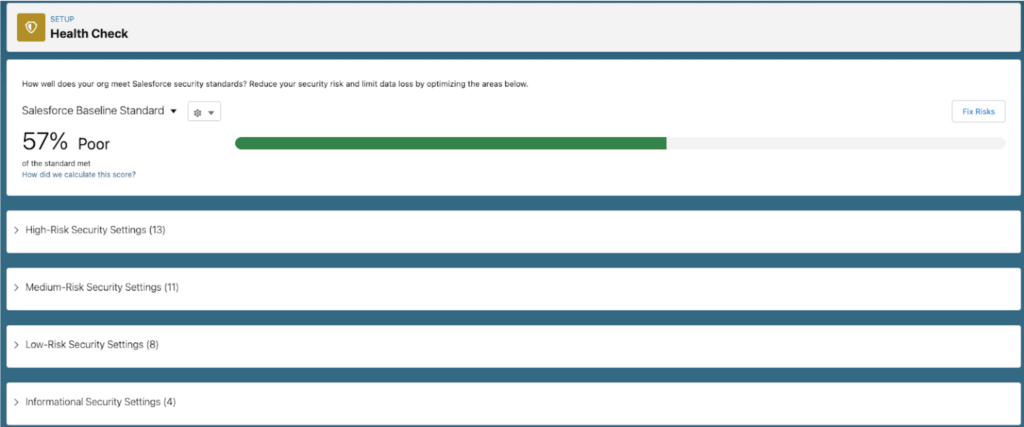
Finally, after that wait, you will see a screen similar to this one:

On this page, you will see an overall score calculated by a Salesforce proprietary algorithm. The higher this number, the better.

Below, you’ll find the issues classified as High Risk, Medium-Risk, Low-Risk, and Informational.

For each issue, Salesforce will provide a description with the classification (critical, compliance, etc.) and either a way to fix it or informational links about how to fix it. 

With all this information, you can fix Security Issues in your org more efficiently.

Watch our on-demand webinar and learn how you can improve the overall performance of your Salesforce Org by doing an Org Health Assessment

Benefits of doing a Salesforce Health Check

Optimal System Performance

A health check evaluates your Salesforce instance’s performance and identifies any bottlenecks or areas of inefficiency. Addressing these issues ensures your system operates smoothly and responds promptly to user interactions.

Data Integrity and Quality

Review the quality and accuracy of the data stored in your Salesforce system. You can maintain reliable data supporting informed decision-making by identifying and rectifying inconsistencies, duplicates, and inaccuracies.

Security and Compliance

Addressing identified security and compliance issues during a health check is crucial to maintaining the integrity of your Salesforce instance. By proactively identifying vulnerabilities and ensuring compliance, you protect sensitive data, preserve customer trust, and mitigate legal and financial risks.

When do you need to perform a Salesforce Org Health Assessment?

  • Encounter errors or performance issues that hinder your operations and revenue
  • Looking for a seamless transition from Classic to Lightning
  • Require assistance with meeting new security requirements or ensuring proper user setup
  • Need a comprehensive diagnosis to determine the actual state of your Salesforce platform

As your business continues to evolve, your Salesforce org should evolve too; running a Health Check is one way to improve your Salesforce org health. Still, you can also run the Salesforce Optimizer, build an Adoption Dashboard, and switching to the Salesforce Lightning experience will help you increase productivity and efficiency, improving the overall performance of your org.

Make sure you run a Health Check at the proper time and the proper way. To learn more about how to keep your Salesforce org healthy, register for our webinar

Migrate from HubSpot to Salesforce this 2023

Migrating to Salesforce can unlock the power of advanced CRM functionality, enabling your business to optimize sales and marketing processes, improve collaboration, and drive growth. This article will explore why migrating from HubSpot to Salesforce can be a game-changer for your businesses, enabling you to achieve higher efficiency, scalability, and success. So let us tell you when, why, how, and more!

Key indicators that it's time to upgrade and transition from HubSpot to Salesforce

1. When business growth outpaces HubSpot’s capacity, struggling to keep pace with the expanding demands of upgrading to Salesforce becomes crucial.

2. In situations requiring advanced sales and marketing features, Salesforce provides a tailored suite of tools for enhanced efficiency and improved outcomes.

3. The need to integrate with a diverse range of third-party applications, systems, or tools has become more important as your business has grown in complexity.

Third party integrations Salesforce

4. When needing advanced reporting, analytics, and visualization features to gain deeper insights into sales and marketing performance, Salesforce’s powerful reporting tools and customizable dashboards can provide the necessary analytics capabilities.

Check out this recent HubSpot to Salesforce migration and customer testimonial.

Why Migrate from HubSpot to Salesforce?

Why Migrate from HubSpot, Zendesk, or any other CRM platform to Salesforce

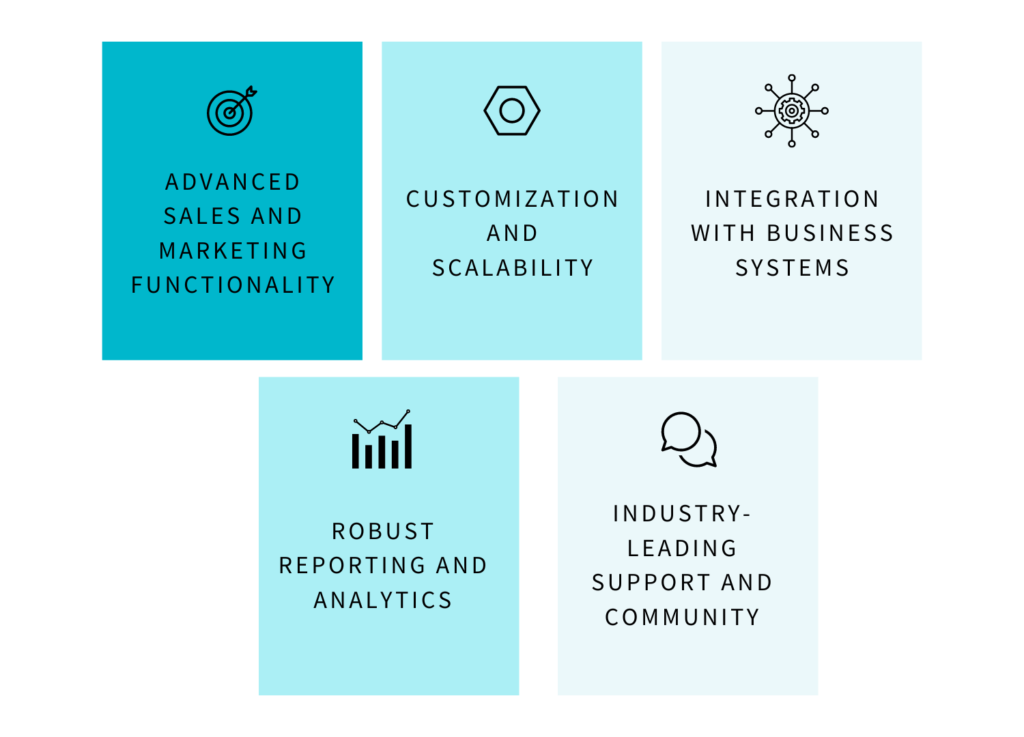
Advanced Sales and Marketing Functionality

Salesforce empowers teams to enhance processes and achieve better outcomes. Businesses gain access to a comprehensive suite of tools and features specifically designed to drive sales and marketing success.

Customization and Scalability

A highly flexible platform that can seamlessly suit any business’s specific and unique needs. From customizing workflows and automation rules to designing personalized user interfaces, Salesforce allows your company to create a CRM system that aligns perfectly with their requirements and grows alongside your organization.

Integration with Business Systems

By migrating, companies can achieve a unified and interconnected infrastructure, enabling efficient data flow, automated workflows, and comprehensive insights across different departments and functions. This integration capability enhances productivity, data accuracy, and decision-making within the organization, ultimately leading to improved operational efficiency and customer satisfaction.

Robust Reporting and Analytics

With Salesforce’s advanced reporting functionalities, businesses can create custom reports and dashboards, track key performance indicators (KPIs), and gain valuable insights into their sales, marketing, and customer service efforts. Additionally, Salesforce’s AI-powered analytics tools, such as Einstein Analytics, provide advanced predictive and prescriptive analytics, helping businesses uncover hidden patterns, identify potential risks or opportunities, and take proactive measures.

Industry-Leading Support and Community

Whether troubleshooting technical issues, addressing implementation challenges, or seeking guidance on best practices, Salesforce’s support team can assist organizations throughout their migration and beyond.

Technical considerations to ensure a smooth and successful migration process

Migrating from one CRM platform to another requires careful planning and care of various technical aspects:

Data Audit

Organizations should conduct a comprehensive data audit to assess the quality, completeness, and accuracy of their existing data in HubSpot. This step helps identify any data inconsistencies or gaps that must be addressed before the migration.

Data Mapping and Cleansing

Analyze the data structure and fields in HubSpot and Salesforce to accurately map corresponding data during migration. Also, during this process, the consultant must identify any inconsistencies or discrepancies in data formats, naming conventions, or data types and address them before the migration.

Migration Tools

Choosing the right technology for migrating to Salesforce is essential to ensure a successful and efficient transition. It is important to carefully evaluate migration requirements such as data volume, transformation complexity, and loading speed to select the most appropriate tool. The correct choice can streamline the migration process, minimize errors, and optimize the performance of the final system in Salesforce.

Some technologies you can consider in this phase are:

Data Loader: Versatile tool that allows loading large volumes of data into Salesforce from various sources, such as external databases. It is efficient for massive migrations and offers advanced programming and automation options.

Data Import Wizard: A simpler and user-friendly tool is ideal for smaller migrations or less technical users. It enables quick and easy data loading from CSV or Excel files, although it has limitations regarding data volumes and customization options.

Bulk API: Powerful option for large-scale migrations. It enables loading massive amounts of data into Salesforce through batch operations, delivering optimal performance and increased efficiency in time and resources. Bulk API is beneficial when processing substantial volumes of data within a limited timeframe, as it leverages Salesforce’s parallel processing capability.

Data Security and Privacy

As a leading CRM platform, Salesforce adheres to industry best practices and compliance standards to ensure data protection. It is essential to define access controls and user permissions in Salesforce. Provides granular control over user permissions, allowing administrators to define roles, profiles, and data access settings to enforce data privacy.

Customizations and Workflows

Understanding the current configurations will help determine how they can be replicated or optimized in Salesforce. This evaluation includes identifying dependencies on specific features or functionalities in HubSpot and finding equivalent or alternative solutions within Salesforce’s ecosystem. During migration planning, it is essential to involve key stakeholders and subject matter experts from both HubSpot and Salesforce teams. This collaboration ensures a comprehensive understanding of the customizations in Salesforce.

Integration with Third-Party Systems

By evaluating the available integration options in Salesforce, such as pre-built connectors or APIs, businesses can identify the most suitable approach to seamlessly connect Salesforce with other business-critical systems. By taking a proactive approach and planning the migration of custom integrations, companies can minimize disruptions and maintain the integrity of data and functionality. 

User Training and Adoption

Knowledge transfer is key to your project. Developing a comprehensive training plan that familiarizes users with the Salesforce interface, features, and functionalities is essential. This plan should include various training sessions, documentation, and resources to help users adapt and maximize the new system’s potential. Salesforce partners like Oktana can significantly facilitate knowledge transfer during migration. They can provide expert guidance and training tailored to the business’s needs, ensuring users have the necessary skills to navigate Salesforce effectively.
Testing and Validation

It is crucial to set up a dedicated testing environment within Salesforce. This environment allows businesses to validate the migrated data, customizations, workflows, and integrations before the final migration. Establishing a structured testing plan covering various migration aspects is essential. This plan should outline specific test scenarios, expected results, and steps to reproduce issues.

Success Case Studies Migrations done by Oktana

High Tech company HubSpot to Salesforce Data & Process Migration

Our customer is a data analytics company that transforms complex data into valuable insights for business decision-makers. As the company expanded and added more processes, the complexity of the CRM grew exponentially, and leaders decided to migrate to Salesforce to increase usability and update all data. The new CRM would also require more functionality and customizations to include a sales management process.

Virtual Events Platform company CRM Migration to Salesforce

We partner with a global virtual event venue company that provides multiple interactive areas optimized for connecting and engaging. This start-up company boosted sales during the COVID-19 pandemic. They decided to change their CRM from HubSpot to Salesforce. This required migrating all their data to Salesforce and recreating all processes and workflows they were already using.

In a nutshell

The decision to migrate from HubSpot to Salesforce requires careful consideration and planning. While the process may pose challenges, it can be successfully executed while maintaining sales and marketing team productivity and ensuring a high data transfer success rate. Key factors include thorough team training on the new system, creating a detailed migration plan, and testing the setup before proceeding with the final migration. By carefully considering these factors and selecting the most suitable approach, your business can successfully migrate from HubSpot to Salesforce, unlocking the potential for improved sales and marketing operations within the organization.

At Oktana, we specialize in CRM system migrations and offer our expertise to guide you through decision-making and address any detailed questions. Schedule a meeting with one of our experts. 

Oktana is a SOC 2 Certified Salesforce Partner

As members of the Salesforce ecosystem, we are all aware Trust is the #1 core value of Salesforce. Customers trust data stored in Salesforce is secure. This expectation of trust naturally extends to any partner accessing a company’s Salesforce instance and connected systems.

Oktana is a SOC 2 Certified Salesforce Partner

Oktana is proud to have maintained SOC 2 Type II certification since 2021, which allows us to provide the assurance we meet the highest data security standards. Since 87% of our business over the past three years is within the High Tech industry, including Healthtech and Fintech, this certification also enables our customers to maintain their compliance certification as we meet vendor security requirements.

What is SOC 2 certification?

SOC 2 is a voluntary compliance standard for service organizations, developed by the American Institute of CPAs (AICPA), which specifies how organizations should manage customer data. The standard is based on what they call “Trust Services Criteria”, covering these core concepts:

  • Security – Your data is managed and stored securely
  • Availability – Your data is always available
  • Processing Integrity – Your data remains intact at all times
  • Confidentiality – Your data is treated confidentially
  • Privacy – Your data is not exposed when not necessary

To maintain our SOC 2 certification, we are audited against a set of security controls supporting these Trust Services Criteria.

Why should you care?

To Oktana, this is the bare minimum a Salesforce partner can provide to you given the sensitivity and importance of the data you store in Salesforce. A SOC 2 certified Salesforce partner confirms they will respect your data and help you provide the same level of trust Salesforce provides to you, to your customers.

Here are some of the benefits of  working with a SOC 2 certified Salesforce partner:

  • Peace of mind and confidence in data security

By choosing Oktana as your Salesforce partner, you can rest assured we are taking active steps to protect your data. SOC 2 certification is an additional guarantee that we are committed to our customer’s data security and that we have implemented appropriate security controls to protect it, including training our team members.

  • Regulatory compliance 

To meet your own regulatory requirements, you may need to require vendors to be SOC 2 certified. By working with Oktana on your Salesforce implementation, you can be sure we meet the necessary bar to enable you to comply with your regulatory requirements.

  • Risk reduction 

By working with a SOC 2 certified Salesforce partner, you can be sure we have taken proactive measures to protect your data and reduce the risk of data security breaches and associated costs. In line with this, we work with you to ensure your proprietary data does not enter Oktana’s systems. We will use your project management software and repositories and, if you prefer, your VPN and hardware.

  • Competitive advantage 

By choosing to work with a SOC 2 certified provider, you can differentiate your company from the competition and improve your reputation and the trust of their own customers.

Our compliance program is robust which has enabled us to work with regulated industries including public sector at both the state and federal levels. In addition to being SOC 2 certified, we can provide onshore resources to meet other compliance requirements. To learn more, check out our Trust page.

Dreamforce 2022: A Guide of What to See & Do

September is almost here, and Dreamforce is just around the corner! The Oktana team will be attending this year, so we’ve been keeping ourselves busy preparing for it with much anticipation.

This year marks the event’s 20th anniversary, and the theme they’ve selected reflects the significance of this momentous achievement: “Go Big and Come Home”.

It will be held at its regular venue, the Moscone Center in San Francisco, from September 20th to the 22nd.

Dreamforce 2022: A Guide to What to See & Do

Why Attend Dreamforce 2022

Dreamforce brings together thought leaders and industry pioneers for a week of idea sharing. You’ll learn, you’ll network, and you’ll grow. And most importantly, you’ll have a ton of fun.

Here are four reasons why we love attending Dreamforce so much…

1. Learn: Dreamforce will have over 1,000 sessions and workshops this year, learn about new products and releases, have hands-on experiences, and get inspired. This is the ‘World’s Largest Software Conference’ after all.

2. Connect: It is the perfect place to meet new people, build careers, and completely transform your career by networking.

3. Give Back: Salesforce is all about Philanthropy, Dreamforce couldn’t be different. By attending Dreamforce, you’re giving back too. Over the years, over $100M has been raised and donated during Dreamforce to a variety of charities and communities.

4. Have fun: When Trailblazers get together, it’s a party. And Dreamforce is the biggest one of all. Dreamforce is a celebration of the community. And this year, the Red Hot Chili Peppers are performing live!

Who is going to be there this year? 

  • Tens of thousands of like-minded Trailblazers from around the world.
  • The Red Hot Chili Peppers! 
  • World celebrities, activists, and athletes 
    • Bono | Lead singer of U2; Co-Founder of ONE and (RED)
    • Jennifer Hudson | Emmy, Two-Time Grammy, Oscar & Tony Award-Winning Artist
    • Matthew McConaughey | Academy Award-Winning Actor, NY Times Bestselling Author & Salesforce Brand Partner
    • Earvin “Magic” Johnson | NBA Legend and Chairman & CEO of Magic Johnson Enterprises
    • Simu Liu | Actor & Writer
    • Dina Asher-Smith | Two-Time Great Britain Olympian
  • Salesforce Chair & Co-CEO Marc Benioff and Co-CEO Bret Taylor

Recommended sessions

The Dreamforce agenda has been released, and great content will be available for all kinds of roles, products, industries, and more. So, how do you ensure to get the most out of your experience? 

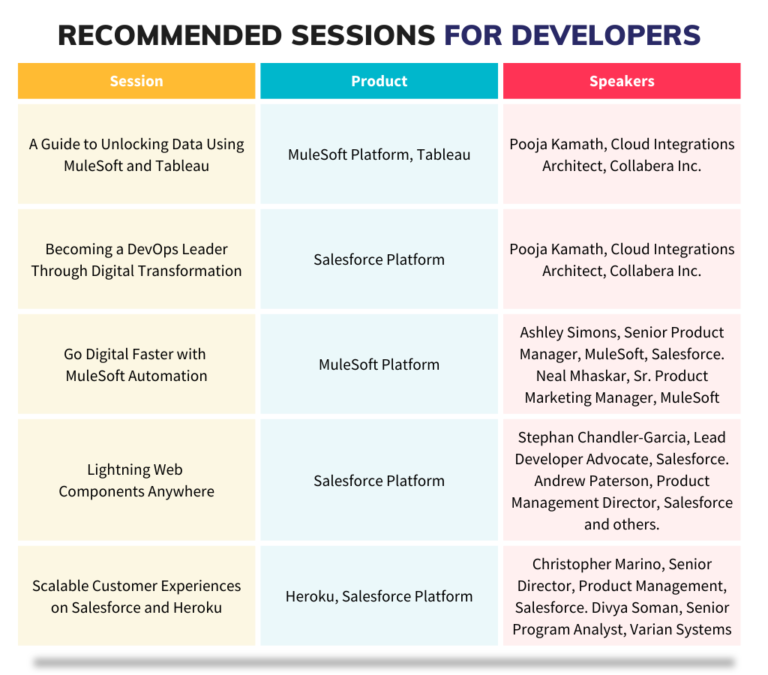
Take a look at these curated lists of Dreamforce sessions we recommend attending based on your role…

Recommended sessions for developers dreamforce
recommended sessions for designers
recommended sessions for admin & architecs dreamforce

See you in San Francisco!

This year we will be attending Dreamforce. We booked a meeting room nearby the Moscone Center (see the map below), so you can meet the Oktana team and chat about Salesforce technologies, languages, and frameworks to enable your company’s innovation.

Interested in setting up an appointment to meet with someone from our team during Dreamforce? If yes, then follow this link to select a time that’s convenient for you.

Here’s the Details…

Where: Mindspace | 575 Market Street @2nd

When: September 20-22 | 10 am – 5pm

Amenities & swag:

  • Lounge spaces with phone booths
  • Kitchen with coffee, water, tea, fruit, and sweets
  • Custom knit socks
  • Webcam covers
  • We’re ordering dozens of freshly baked alfajores as a way of sharing our company’s South American culture with those visiting our meeting space
 
Oktana team attending Dreamforce:
  • Jaime Solari | CEO
  • Marcos Solari | Co-Founder
  • Dennis Picht | CRO
  • Christine Burnham | VP of Sales
  • Jon Parker | Strategic Account Executive
Meet Oktana at Dreamforce
Oktana at Dreamforce

Ruby on Rails and Salesforce

How you can integrate Ruby on Rails and Salesforce? This question and more will be resolved in this article. Let’s start! Ruby on Rails (Rails) is an open-source web application framework, written in the Ruby programming language, that is used in many big-name applications, like GitHub, Airbnb, Hulu, Zendesk, and more. And as with all open-source projects, you can always contribute code. 

The Rails Doctrine

Rails has some interesting pillars that every developer should know: 

  1. Optimized for programmer happiness – “Ruby is designed to make programming not only easy but also fun” (Yukihiro Matsumoto)
  2. Convention over Configuration – The environment in which you work assumes many logical situations by default, so if you adapt to them rather than creating your own rules each time, programming becomes an easier and more productive task
  3. Rails is ‘omakase’ – Omakase is when you don’t know what to order in a restaurant and let the chef choose. In Ruby, this is the practice of letting others assemble your stack for you.

Check out the official site of Ruby on Rails and go deep into Ruby.

Integrating Ruby on Rails (Rails) with Salesforce

Salesforce, as the leading CRM, is constantly working to innovate, making it a great platform to integrate your applications with. Rails, like many other platforms, is frontend agnostic, giving you the flexibility to choose the tools and technologies that make the most sense for your project. Salesforce brings a robust set of APIs into the mix, letting you make use of the data and logic in Salesforce within your Ruby application. 

Pick the Right API(s)

This is the one area where you’ll need to make some choices, depending on what you need your application to do with Salesforce. Knowing which APIs you need will help guide which gems to install.

  • SOAP API – Create, retrieve, update or delete records, such as accounts, leads, and custom objects. Allows you to maintain passwords, perform searches, and much more. Optimized for real-time client applications that update a few records at a time. Indeed you can use it for processing many records, but when the data sets contain hundreds of thousands of records, SOAP API is less practical. Process data from a few thousand to millions of records very simple with the Bulk API.
  • REST API – Powerful, convenient, and simple REST-based web services interface for interacting with Salesforce. Based on the same underlying data model and standards objects as the SOAP API. (Other REST APIs that may be of interest: User Interface API, Connect REST API.)
  • Bulk API – This is based on REST principles and is optimized for loading or deleting large sets of data. You can use it to query, queryAll, insert, update, upsert, or delete many records asynchronously by submitting batches. Salesforce processes batches in the background. Also, another benefit of the Bulk API is that it has higher record limits.

Get Authenticated

Salesforce leverages OAuth 2.0 for authentication. There’s no need to code any of this from scratch, just leverage the Ruby gems (ruby software packages) restforce and omniauth-salesforce. Check out connectSFDC for a rails project with omniauth-salesforce installed and ready to interact with a Salesforce Connected app.

Integrate Your Application

If your application needs real-time access and is only updating a few records at a time, you can make use of the Restforce gem to access the REST API.

  1. Add ‘restforce’ or install manually with ‘gem install restforce’)
  2. Instantiate your client object and authenticate using OAuth.
    ‘Client = Restforce.new’
  3. Query away. (See the official Restforce documentation for all your options.)

For the SOAP API, use Soapforce

  1. Add ‘soapforce’ to your Gemfile or install manually with ‘gem install soapforce’.
  2. Instantiate your client object and authenticate using OAuth.
    ‘client = Soapforce::Client.new’
  3. Query as needed. (See the Soapforce Github page for options.)
  4. Log out.
    ‘client.logout’

For the Bulk API, use SalesforceBulkAPI

  1. Add ‘salesforce_bulk_api’ to your Gemfile or install manually with ‘gem install salesforce_bulk_api’
  2. Authenticate using restforce with OAuth.
    ‘client = Restforce.new(…’
  3. Instantiate using the Restforce client.
    ‘salesforce = SalesforceBulkApi::Api.new(client)’
  4. Query as needed. (See the SalesforceBulkAPI page for options.)

Much of the groundwork has been done for you with these gems. The robust Salesforce APIs make it easier to bring the functionality and data into your Rails app. (Not into Ruby? You could always check out our article on Python with Salesforce.) 

Let us know how you’re approaching your Ruby on Rails and Salesforce projects.

Footer - Ruby on Rails and Salesforce

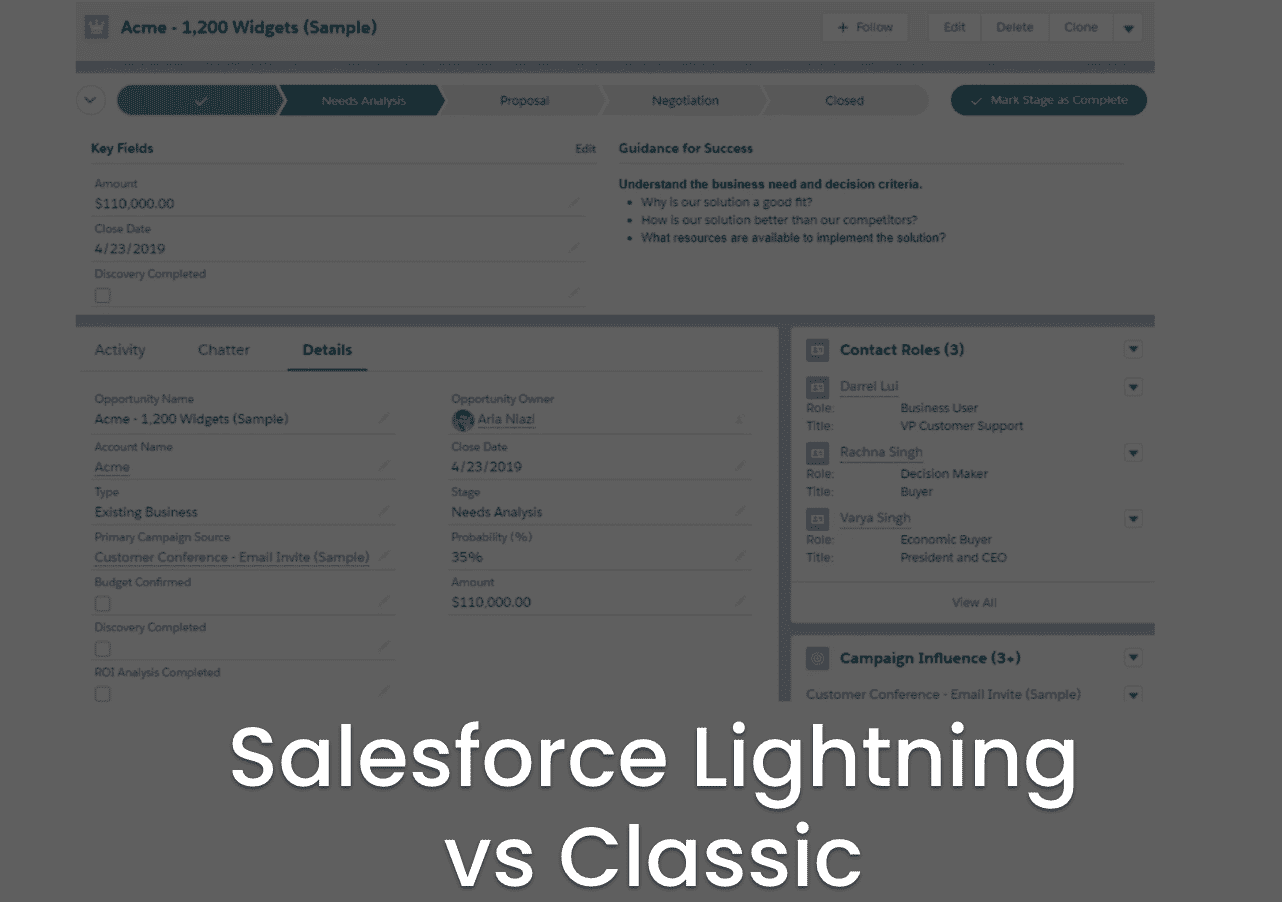
Salesforce Classic vs Lightning: More than a pretty interface

When we first published “Lightning Experience vs. Salesforce Classic: Is the Lightning Experience Revolutionizing Salesforce?”. Over two years ago there were many features missing from the Salesforce Lightning Experience. Making the conversation about the UI and what was missing. Certainly, over the last two years, Salesforce has significantly closed those gaps. Now, only discussing the Lightning UI misses many of the benefits it has introduced. 

User Experience

Often the most controversial part of any redesign, the user experience in Lightning is significantly different than Classic. It’s common for users of a product to resist changes to their experience. Lightning brings benefits for those that do. Whether your users are selling, helping, collaborating, or marketing, there are improvements to help them get their work done faster. Salesforce worked to simplify the user experience and create more efficient navigation. That allows you to not only change records quickly but change applications.

Significant work has gone into refreshing record layouts, dashboards, and report views. When Lightning was first introduced, admins and users were finding themselves having to switch back to Classic for specific tasks. Now that happens far less often. With the Lightning App Builder, it’s easy for admins to create new custom page layouts. The benefits aren’t limited to administrators. Here are a few areas the experience has improved.

 Salesforce Lightning Experience

  • Home 

Salesforce has transformed the way you start your day by adding an intelligent Home page. Sales reps can monitor their performance to goal and get insights on their key accounts, with an assistant providing the complete list of things to do. Admins can use the Lightning App Builder to create custom Home pages.

  • Opportunity Workspace

The new design allows you to help your sales reps work their deals faster. Lightning enables you to showcase key record details in the new highlights panel at the top of the page. Also, get key coaching details with a customizable Path to support your sales process. And, see a wealth of related information on hover using a quick view.

  • Accounts and Contacts

Lightning has optimized the layout for accounts and contacts, organizing the content by their primary use case: reference. Your sales team can locate important data efficiently, get the latest news for your customers, work smarter, keeping the data clean with field-level duplicate matching, among other functions.

  • Reports and Dashboards

Now users can create their filters while viewing a report. Also, if you already have reports from Salesforce Classic, the transition is very easy, because the reports are automatically viewable in the new interface.

Architecture 

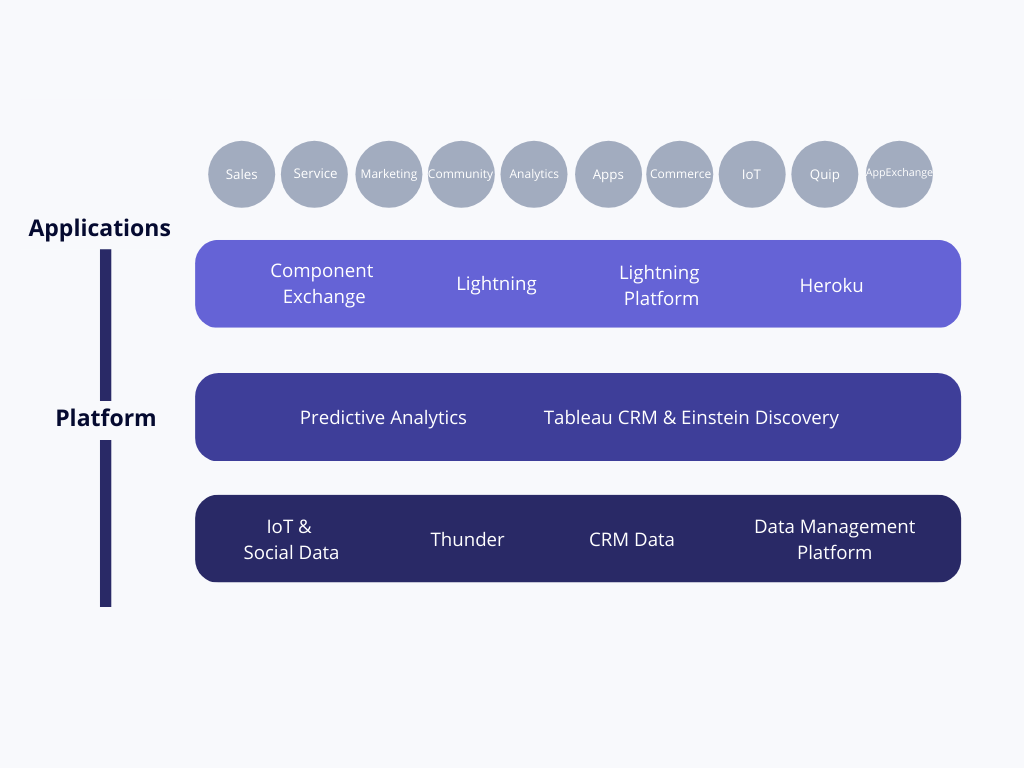
Meanwhile, when someone says Lightning, it’s common for people to think just about the new user experience. Wrong, Lightning brings even more. Lightning as a platform has improved the experience for users, administrators, and developers. With new frameworks, Salesforce has made it significantly easier to create new pages and applications and made data access easier to manage. 

The new Lightning architecture takes advantage of modern web stacks that are now more standards-based, with Lightning Web Components providing a layer of specialized Salesforce services. You no longer need a proprietary component model, proprietary language extensions, proprietary modules, etc. For example, there are many significant benefits such as:

  • Common component model
  • Common programming model
  • Transferable skills and easier-to-find / easier-to-ramp-up developers
  • Interoperable components
  • Better performance because core features are implemented natively in web engines instead of in JavaScript in framework abstractions

Development 

Developing in Lightning requires a mind shift, but opens doors. Salesforce Classic was built around a page-centric model, while Lightning is based on an app-centric one. Basically, now that Classic Visualforce is only one (older) option, it’s possible to build web applications that are mobile-ready and run natively in browsers, even faster. Furthermore, the new lightning component architecture gives you two programming models: the Lightning Web Components model and the original Aura Components model. 

in addition, if you are currently developing Lightning components with the Aura programming model, you can continue to do so. Both can coexist and interoperate. But, in the future, we recommend you consider migrating your Aura Components to Lightning Web Components. Start with the components that would benefit the most from the performance benefits of Lightning Web Components.

“Lightning offers us the opportunity to use Lightning Web Components, these allow us to perform faster tasks with custom components, which can be used in different pages with just a drag and drop. It has great compatibility with different browsers which allows us to work without problems on desktop and mobile devices.”

Alexis M, Developer

“With Lightning Web Components I have been capable to develop reactivity, responsive and scalable solutions, thanks to its state-of-the-art web architecture that integrates features like Lightning Design System and MCCV model, leading to smoother development and a more comfortable user experience.”

Christian R, Developer

Check out one of our latest workshops. Mateo H, developer, shares one of the latest components our team has been working on:

If you want to discover more about Salesforce Lightning, we recommend you check out this module on Trailhead. That is to say, if you want to go deep into the main differences check out the Salesforce help page: Compare Lightning Experience and Salesforce Classic

Our team has also worked with different organizations and their projects. We are Salesforce platform experts and we offer custom development to help you build your platform and solve the right problems. If you want to know more about our work, go check out our latest success stories.

How to set a tamper-proof Salesforce session cookie with Apex

Imagine we have a website in which we want the user session to persist for a specific period, even when the user closes and reopens the browser. 

Our goal is to have operations/logic for a particular user persist on the website. Whenever the user returns to the site within a given amount of time using a session cookie.

There are a multitude of ways to store the session data. In this article, we are focusing on client-side storage (cookies). Cookies are small pieces of data that are transmitted from the server to the client (generally done once.) Then when the user comes back to the site, the cookies are sent back to the server. This allows us to track a single user across multiple connections to our site. 

Why should I care about the expiration?

Being able to easily expire user sessions allows for extra security measures. In our case, if we wanted to add a new feature that allows us to sign out of all sessions in other locations (machines where the user has logged in), this (expire session cookie) would force those other locations to re-authenticate before gaining access to the account.

This is a good security approach for when a user’s cookie is stolen or his credentials are compromised. Upon changing his password all his sessions are invalidated. An attack using an old cookie cannot continue to wreak havoc on the user’s account.

Signing your session cookie

As we know, all data stored on the client-side could potentially be compromised as a user can maliciously tamper with it. And since we are not able to avoid it, we might provide the server with the feature to recognize this manipulation. 

This feature consists of a cryptographically signed cookie. Upon receiving the cookie from the client, verify that the signature matches what you are expecting. 

HMAC (Hash-based message authentication code) is a cryptographic construct that uses a hashing algorithm (SHA-1, SHA-256, SHA-3) to create a MAC (message authentication code) with a secret key. Salesforce provides us with a class named Crypto that contains methods for creating digests, message authentication codes, and signatures, as well as encrypting and decrypting information. Click here to see more about Crypto.

Let’s code!

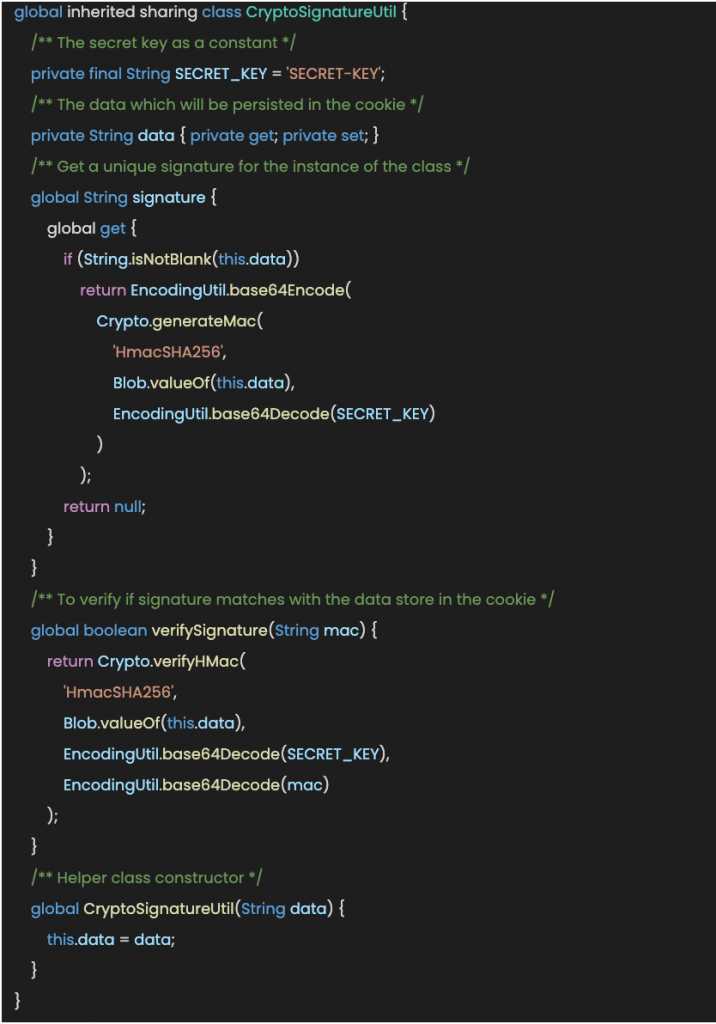
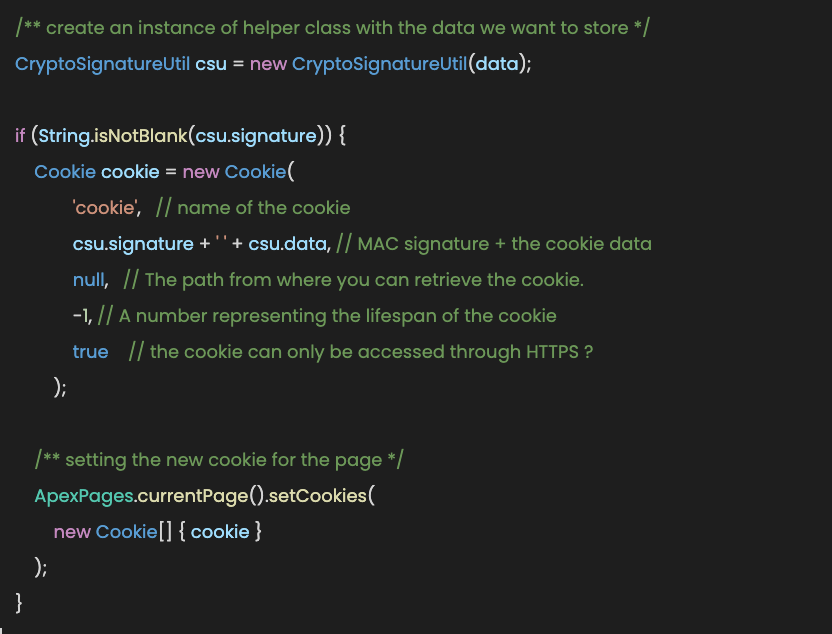
We are going to create a global helper class for signing session cookies. That we will be able to re-use in any part of our project.

Session-Cookies-with-apex-1

Within this class, we are using other Salesforce helper classes such as Blob (Contains methods for the Blob primitive data type) and EncodingUtil (to encode and decode URL strings, and convert strings to hexadecimal format).

This allows us to do the following:

Session-Cookies-with-apex-2

We can then send that to the client that requested the page. Once the client visits the next page, their browser will send that same cookie back to use. 

Assuming we need to store the ‘session ID’, we would get this as result:

Session-Cookies-with-apex-3
Session-Cookies-with-apex-4

Note: 

All cookies created from Salesforce contain ‘apex__’ as a prefix and are encoded before being set for the page.  Learn more about cookies here

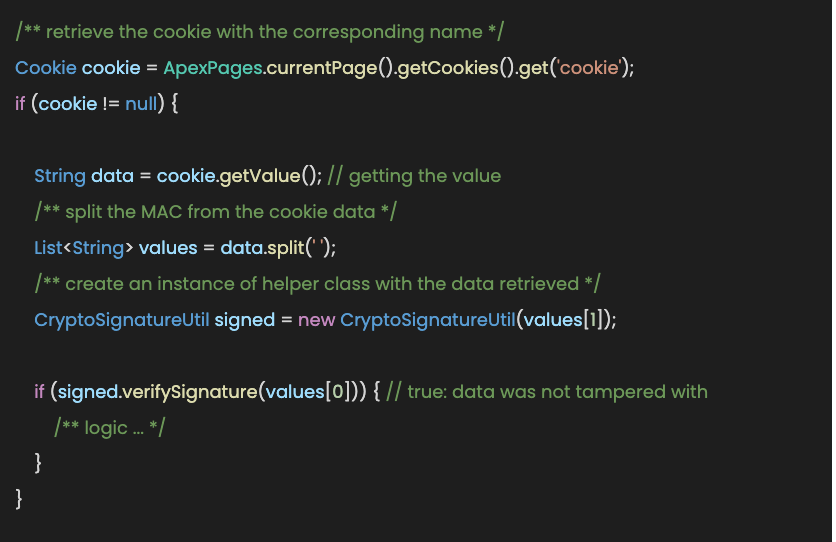
To retrieve and verify the data was not tampered with, we could do the following:

retrieve-and-verify-data-apex

If the MAC is verified, it means that the data was not tampered with by the user and we can continue our business logic. 

Real Secret Key

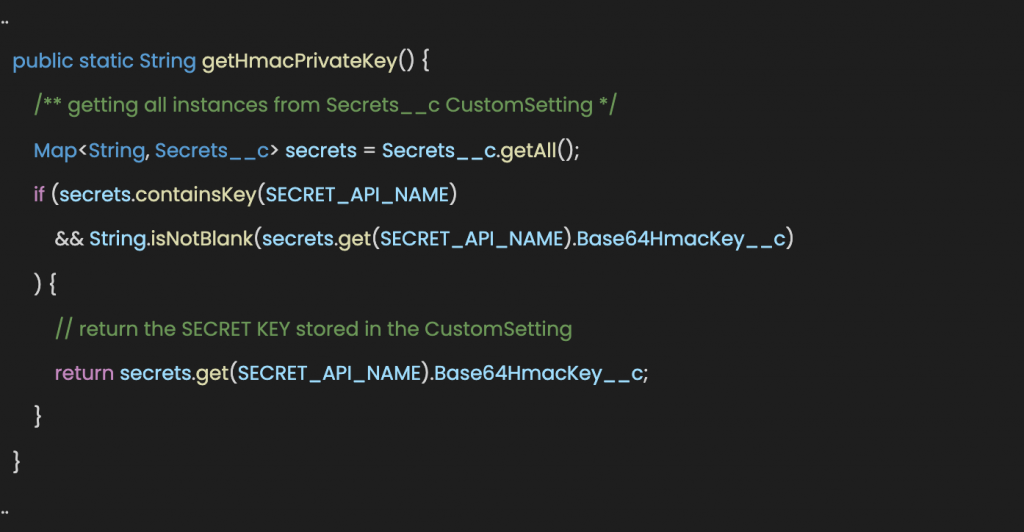
For extra security measures, we might set an auxiliary CustomSetting for storing AES secret keys. We will create a Secret__c CustomSetting with a field named Base64HmacKey__c.

Now, we are going to refactor our code to include this new approach:

  • Add a new variable to our helper class
new-variable-helper-class
  • Add a new function to get the secret key from the CustomSetting
CustomSetting
  • Lastly, modify the private variable named SECRET_KEY
secret-key

Now we have better handling of our secret key.

Encryption

When using client-side storage, it may be beneficial to encrypt the data to add an extra layer of security. Even when encrypting the data, you need to continue using a MAC.

Using just encryption will not protect you against decrypting bad data because an attacker decided to provide invalid data. Signing the cookie data with a MAC makes sure that the attacker is not able to mess with the ciphertext.

If you’ve made it this far, thanks for reading! Also, if you are interested in Salesforce development go and check our latest articles here.