Custom Labels are custom text values that can be accessed from Apex classes, Visualforce pages, or Lightning Web Components and allow developers to build multilingual applications to provide a localized user experience.
We have a more detailed guide on localization with Salesforce Custom Labels, but below is an easy cheat sheet covering the basic mechanics. You’ll learn how to easily translate all Custom Labels from any application into a new language, whether translating with Google Translate, like below or through a human translator.
Salesforce Custom Label Translation Cheat Sheet
1. First, on your org code directory, go to src/labels to download CustomLabels.labels. Now go to src/translations to download the most current and complete translated language, for instance, fr.translation.
2. Rename both files as .xml.
3. Open MS Excel (at least 2007 version) and select the Developer tab. Go to XML, click on Import button and select the CustomLabels.xml file.
4. Delete all columns except ns1:fullName and ns1:value.
5. Filter column ns1:fullName with Contains Labels.
6. Select columns ns1:fullName and ns1:value (and its rows), then go to Find & Select. Go to Special, select checkbox Visible cells only, and then click the Ok button.
Now you can copy only the rows that are displayed within the filter.
7. Open Google Docs and choose the Blank Sheet option.
8. Paste copied rows directly into the Google Sheet.
9. Select all columns, then go to Data->Sort Range and select to order first by ns1:fullName and second by ns1:value. We have to do this because we need at least one of the label columns to be sorted so that when we are looping through the other set of data, we are sure we are looping all possible labels.
10. Add a new header to ja.translation.xml file, name it Translation. Add in the first cell =GoogleTranslate (<ns1:value cell>, “en”, <CodLeng>). For example: =GoogleTranslate(B2, “en”, “ja”), then copy or drag the cell until all the rows have been translated.
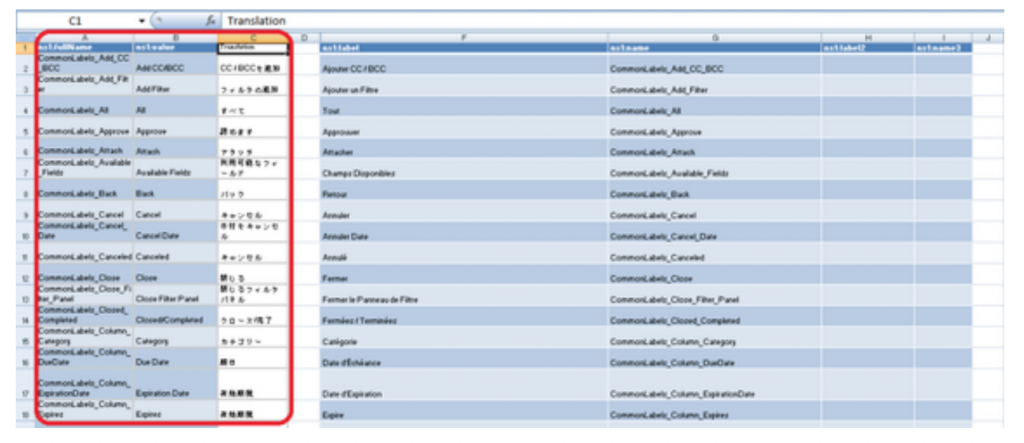
11. Copy all Google Sheet columns and paste them at the left of the Excel sheet fr.translation.xlsx like this:

12. Add a column in which we will match label cells hence the translation) from both tables with this formula: =VLOOKUP($G2;$A$1:$C$1 91;3;FALSE). The $ character is used to fix a column or a row depending on its placement. (If it is before the letter, that column will be fixed despite copying the formula to other columns. If it is before the number, you are fixing the row.)
- “$G2“ is the first cell from the right dataset which contains the first custom label name and will loop through $A$1 up to $A$191 (in this example), searching to match labels.
- The range ($A$1:$C$191) is fixing the column and row of the left set of data.
- “3” indicates which value from the range of data we would like to copy when there is a match in the search, in this case, it will be doing so from the Translation column.
- “FALSE” forces that the formula only retrieves a match by exactly matching the label names.
13. Delete those cells where the formula returns #NA (meaning, there was no match between label names).
14. Where a translation was returned, replace the right dataset cell from column ns1:label with this value.
15. Once done, delete the left dataset (A to C columns) as seen in the above screenshot leaving ns1:label as Column A.
IMPORTANT: ns1:label2 and ns1:name3 are created for custom tabs values. We need to translate these, save the translation somewhere else and delete them from ja.translations.xlsx.
We will later add them to the ja.translations.xml this way:
<customTabs>
 <label></label>
 <name>DocumentLibrary</name>
</customTabs>
<customTabs>
 <label></label>
 <name>Tasks</name>
</customTabs>
16. Save the Excel sheet, go to Developer:

17. Click on Developer:

18. Click on Export and save the file as <CountryCode>.translation.xml.
19. Remove the .xml extension.
20. Add any customTabs deleted together with their translations as described in Step 15.
And that’s it! Learn more from our team, or check out our services.


1 Comment
You need to be careful using Google Translate this way as the resulting translations will sometimes be inaccurate or have improper context. Always have a native speaker review your translations before implementing to avoid confusion.
To give an example: translating “New Account” button label may end up with “新しいアカウント” (Atarashii akaunto) which is the literal translation but which lacks the nuance of “Create a new account” that the English has. Also using the transliterated term for Account (アカウント) would not match up with the standard term in the Japanese Salesforce UI which is “取引先” (Torihikisaki).
The proper translation in this case would be “新規取引先”.
Comments are closed.